
Starlink continues to capture imaginations the world over. The promise of universal internet access is closer than ever, thanks to the high-speed internet that’s beamed by satellites. However, Starlink still comes with some issues that may hamper its adoption across the globe. The biggest issue that internet users might face with Starlink is the use of carrier-grade NAT (CGNAT).
Simply put, your internet connection is not fully open, and won’t be able to do port forwarding thanks to a double NAT connection or your ISP performing CGNAT on your connection.
Why is Port Forwarding a problem on Starlink?
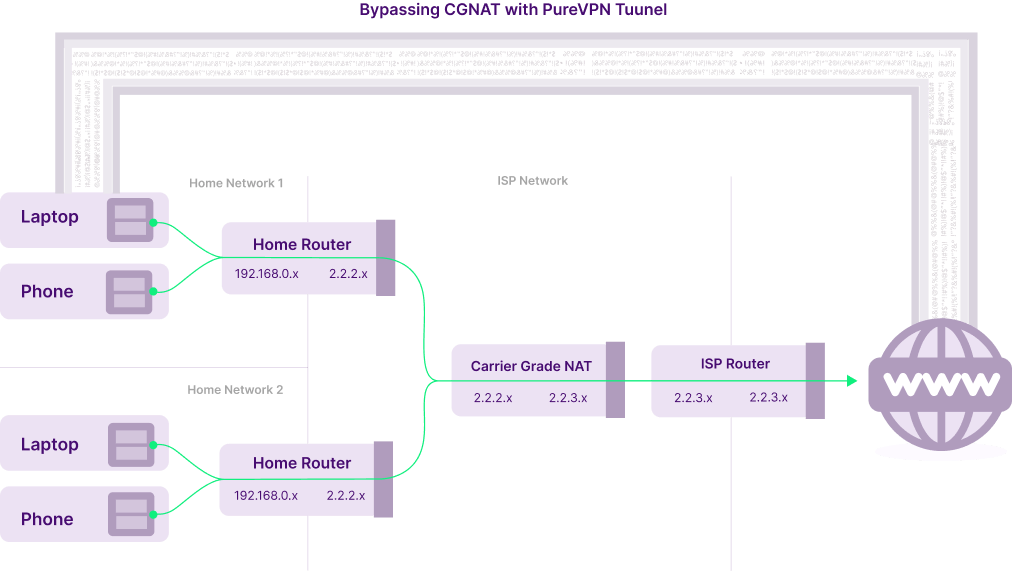
One of the main reasons Port Forwarding on Starlink can be problematic is that many ISPs use Carrier-Grade NAT (CGNAT) to conserve IP addresses. Your ISP assigns a single IP address to several users, and all rely on that IP address.
What is CGNAT?
CGNAT stands for Carrier Grade Network Address Translation. Most ISPs, including Starlink, use CGNAT to conserve their IPv4 pool. The IPv4 protocol only supports 4 billion IP addresses. ISPs perform CGNAT to assign a single IP address to multiple users, saving their depleted IP pool.
Bypass CGNAT on Starlink
To make this process easier, use the PureVPN port forwarding add-on. This add-on will allow you to bypass CGNAT and configure port forwarding for your devices. Here’s how it’s done:
- Sign up for PureVPN.
- Login to the PureVPN member area.
- Click the subscription tab.
- Click Configure.
- Apply your desired port settings (scroll below).
- Click Apply settings.
How do I know if CGNAT is enabled on Starlink?
You can determine if CGNAT is enabled on your Starlink connection by checking your public IP address. If CGNAT is used, the public IP address assigned to your device will be shared with other Starlink users. You can check your public IP address by visiting a website that displays your IP information, such as whatismyip.com. If your public IP address changes frequently, it indicates that CGNAT is enabled on your Starlink connection.
Fix Double NAT with Starlink
You can’t use a public IP address that can easily port forward on Starlink. However, you can resolve the Double NAT issue using a VPN service (like PureVPN) that offers a static and dedicated IP address.
You will have to set up your router to use the dedicated IP address that you use with your VPN. You will need to use this WAN IP address on your router to set up the WAN connection. If done right, you can bypass both the CGNAT restrictions and the Double NAT status.
Frequently Asked Questions
Does Starlink use CGNAT?
Yes, Starlink uses Carrier-Grade Network Address Translation (CGNAT) technology to share a single public IP address among multiple users. This allows the system to conserve public IP addresses, a limited resource, while still providing internet access to many users.
Does your Starlink Router have CGNAT?
It does. This is because Starlink provides CGNAT-enabled routers to assign IP addresses. By doing so, the Starlink router works with other ISPs.
How can I bypass CGNAT?
The simplest way to bypass CGNAT with Starlink is to use a VPN service. By doing so, you use a virtual and dedicated VPN tunnel between your internet-enabled device and a VPN server. You get another ISP address as a result.
Does CGNAT affect online gaming?
Absolutely. Modern online multiplayer games rely on incoming and outgoing connections to host, connect and communicate. CGNAT blocks incoming traffic by default. You must bypass CGNAT for the best online gaming experience, especially when using Starlink.